can i make facing longer on top pattern sewing
New Items Added Daily. Cut every few stitches then gently pull the two layers apart to separate them.

Twisted Halterneck Crop Top Digital Pattern Pdf Easy Sewing Etsy Uk Easy Sewing Patterns Sewing Patterns Crop Tops
Lastly fill in the missing part of the side seam line and cut away any excess paper.

. Trace this off add seam allowances and. Fold out the dart in the facing and secure with sticky tape. Pin and sew the outer edge with a narrow hem.
Seam allowances are 15 cm in this case or ⅝ in. Before you attach your facing sew a zigzag stitch along the bottom edge of the facing- this will prevent your fabric from fraying. Sew from the top left corner to the bottom right corner of the intersection.
Once you get some practice you will find the fabric cutting angles that are most comfortable for you to work with and working with on-fold patterns are easier to. A walking foot might be helpful here if your lining is very slippery but I found that a few well-positioned. The main difference is that a facing is a pattern piece that is the same shape as the pattern piece it is being sewn to instead of a trim that is added on.
Use a pin to mark where the new hem should sit. This helps to maintain the integrity of the grain of the fabric and gives you more control. Match up the side seams of the facing to the shoulder seams and pin or clip it into the opening.
See thousands of Designs. Sew your bodice shoulder seams right sides together. For this class Im going to ask you to make the all-in-one facing pattern and sew it.
Finish the centre back according to your pattern I usually make a roleau loop and add a button. Draw in the width of the facing. Using a seam ripper separate the lining and self fabric layer dress layer by carefully cutting the stitch that connects theses two layers.
Take a fabric pen and mark ½ inch beneath the pin. Stitch it to the garment. Longer the facing and the garment front can be pinned together evenly.
Fold the other rectangle from knit fabric in half lengthwise and stitch the stitch will be the side seam. To attach the facings I laid each coordinating facing piece on top of the right side of the lining matching the outside edges and pinning the facing into place on top of the lining. Finger press the seam open.
Apply the interfacing to the facing piece. Lay your facing to the top edge of the neckline. Sew the neckline on both front and back parts.
The distance between the two lines is your prefered seam allowance x2. Another process is by sewing the facing at the side seams and not on the shoulder seams. After you have sewn the facing to the garment and trimmed away the excess open the facing out with the seam on the facing side and top-stitch closely to the seam line through the facing and the.
Make sure the front facing is with the front bodice and back facing to back bodice. To make the pattern for a one piece armhole facing you would line up your front and back patterns at the shoulder and tape together. Leaving inside out insert the facing so that the RIGHT sides of the bodice and facing are touching.
Get Inspired for your next quilt or project. Start by sewing together at the shoulders. The front garment can have a straight or curved hem.
Sew the side seam from the hem to the waist. This method secures the facing the best and works best on stable fabrics like cotton. Finally you could also do a bit of decorative top stitching but be sure to use a stretchable stitch.
Roughly cut the pattern paper around the facing. One method of securing the facing to the bodice is to topstitch the edge. Sew the facing all the way around the wider external edge.
Now pin the facing in place ensuring the it sits as flat as possible without puckers or gathers. If you cannot see the line use a water soluble marking tool and ruler to draw in your sewing line first. The pink is for the facing and the green for the lining.
Fold the fabric in half lengthwise and stitch sleeves seams lines AE to CL and FB to MD. I like to make my facings curved to allow for a soft line that doesnt show through the outer fabric. Cut the fabric in the same pattern.
If the folded-out-dart has created. Draft the facing and lining pattern pieces. Step 2 - Remove the blouse and lay it on a flat working surface.
Easier to work with and faster to cut. Then turn it around to the inside. Stitch close to the zipper teeth.
As you already know the best way to learn pattern making and sewing is by doing it yourself. Ad Find Deals on beginner hand sewing projects in Hardware on Amazon. If you sew in the other direction you will push the fabric grain open as you stitch and will end up with a longer piece on top.
Sew the side seam match up the seam where armhole facing meets blouse sew from edge of facing all the way down to the hem. This gives a very smooth outer edge. Keep that top rule in mind.
What ever you do with the bodice do with the facing. Youll find that with the help of a seam ripper this is quite easy to do. Line ou the side edges sew together and.
Now align the lengthenshorten line on the bottom piece with the lower horizontal line matching up the vertical lines or grainline arrow. Measure the bottom multiply this by 15 and add in 5 for seam allowance. Pin the neckline facing.
Turn the facing over the pressed fold line and pin it like this right sides together. Stitch it together with shoulder seams. Press or fuse the interfacing to fabric.
Start stitching by slightly overlapping the stitches on the vertical seam you just stitched. Trace around the edge to be faced including the dart. Make sure the fabric is right sides together.
By making the front facing about 2-in. Step 1 - Try the blouse on and fold the existing hem over until you reach the desired length. Using cut-on-fold sewing patterns makes the pinned-together pattern and fabric more flexible to move around and turn for a more convenient cutting angle.
Then to face the neck opening hence the term facing Sew the facing and bodice right sides together along neck opening. Draft two lines on the front and back bodice pattern pieces. If using a sturdier fabric you may want less ruffle in that case multiply by 13 or 14 Cut a strip of fabric to your calculated width and height.
At this point you have TWO OPTIONS to secure the facing to the inside. Cut the seam allowances on the facing and cut at the corner for turning it on the right side. With a ruler extend the grainline arrow from the top pattern piece right down through the paper you just attached.
One Piece Armhole Facing. Now cut 1 cm deep notches at points E F L and M. Repeat the same on the other side of the robe.
Remember that if you have any questions about this class you can always send me an email through your user account in the support section. I edgestitched the facing to the lining to secure it. Mark in a line at a consistent width all around the armhole from back side seam up to the shoulder and around to the front side seam.
Ive never had a problem with the shoulder or underarm seam. Using your preferred method finish the top and bottom of the strip. Once the facing is sewn to the vertical edge redraw the hem curve.
Ad Shop Our Latest And Greatest. These things happen. You also might want to make the facing a bit wider but an inch but not much more so that you have more fabric on the wrong side and that alone will also keep the facing inside better.
Pin top and bottom parts right sides together and stitch.
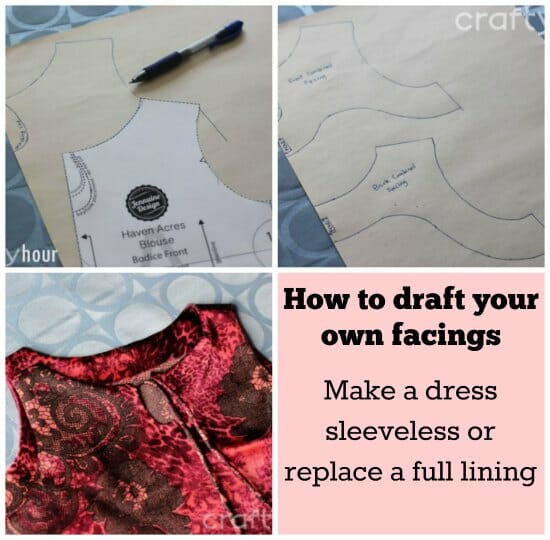
How To Draft Your Own Facings So Sew Easy

How To Sew A Neckline Neck Facing Tutorial Melly Sews

Instructions To Make Your Own Bonnet

Easy One Piece Pattern For Pants 6 18 Months Cloth Diaper Friendly Too
Jalie 3880 Bobbie Worry Free V Neck Loose Fit Top Sewing Etsy Sewing Top Top Sewing Pattern Sewing Patterns

Dolman Tee Pdf Sewing Pattern

Diy Button Up How To Make Your Own Button Up Pattern

How To Sew A T Shirt For Men Sewing Method Sewing Tutorials Sewing Patterns Sewing

Self Taught Sewing

Free Sewing Tutorial Drafting A Facing For A Cowl Neck Top Sewing Tutorials Free Sewing Tutorials Free Sewing

Wave Womens Pdf Sewing Pattern Pdf Sewing Patterns Sewing Pattern Design Sewing Patterns

M7390 Digital Peplum Top Pattern Long Sleeve Blouse Pattern Womens Sewing Patterns

Diy Long Sleeve New Pattern Shirt Creative Fashion Blog

Diy This Custom Fit Wrap Top To Wear All Summer Long

Pin On Top Patterns Modeled Pictures

Liola Designs Luna Top Sewing Pattern

How To Make A Facing Pattern The Pattern Pages Sewing Magazine